Saturday, August 10, 2013

Chocolate Wasted Cake

So, I'm going to be completely honest with my readers (even if there are only a few of you guys. You still matter)... Right now I'm going through and awful breakup and all I have any desire to do is sob, eat chocolate, and get wasted. Unfortunately, I haven't reached the legal drinking age and my appetite is screwed up so chocolate isn't an option, but that wouldn't stop me from abandoning my crying for a little while to create this monstrosity.

Meet the chocolate wasted cake. It is everything that you've dreamed of but have also feared because it has seriously potential to put you in a diabetic coma by just sniffing it. I'm not even kidding. 

I made this cake a couple of weeks ago with my friend, Dylan (pictured above, staring at my camera like a creep). He's been supportive and understood my desperate need to bake and not talk about all the crazy crap that I've been dealing with. I'm really happy he came over, and we had a lot of fun making this. It might have been a bad idea to let him choose this recipe and then send him home with half a cake (he later even made his own version!).

So let's get chocolate wasted, everyone.

What you'll need (for the cake):
  • 3 cups flour
  • 2 1/2 cups sugar
  • 1 cup cocoa powder
  • 2 teaspoons baking soda
  • 1 teaspoon salt
  • 2 cups milk
  • 1 cup butter, melted
  • 4 teaspoons corn syrup
  • 2 teaspoons vanilla extract
  • 1/2 semi-sweet chocolate chips
What you'll need (for the frosting):
  • 1/2 cup butter, room temperature
  • 3 cups powdered sugar
  • 1/4 cup cream, room temperature
  • 1 teaspoon vanilla extract
  • 1/3 cup chocolate chips
Melted chocolate to drizzle on cake (I had issues with this, because I got distracted...)
  • 2 cups chocolate chips
  • 3/4 cup heavy cream
  • chocolate chips for side of cake and chocolate candies, chopped,  to top the cake with
To prepare the cake:
-Preheat the oven to 350 degrees.
- Grease and flour two 8 or 9 inch round cake pans and set aside.
- Sift together the flour, sugar, cocoa powder, baking soda, and salt in a bowl, then set aside.
-In a separate bowl, mix together the milk, corn syrup, butter, and vanilla.
-Slowly add the dry ingredients to the wet mixture and stir until combined. Fold in chocolate chips.
-Pour even amounts of batter into the prepared pans and bake for 30-45 minutes or until a toothpick inserted into the center comes out clean. Place on a cooling rack and allow the cake to cool completely before decorating. 
To make the frosting:
- In a bowl, beat the butter until smooth. Beat in the powdered sugar, cream, and vanilla into the mixture until smooth.
- Place chocolate chips in a small bowl over a pan of barely simmering water. Heat and stir occasionally until the chocolate is melted and smooth. 
-Remove chocolate from heat and slowly mix chocolate into frosting mixture. 

Dylan was hard at work to place chocolate chips all around this freaking cake.

To assemble the cake:
-Frost the bottom layer of the cake, place the next layer on top and continue to frost.
-Place chocolate chips on sides of cake, then chocolate candies on top. Drizzle cake with melted chocolate.
-Dig in and try to not lose a foot to diabetes.


Monday, July 22, 2013

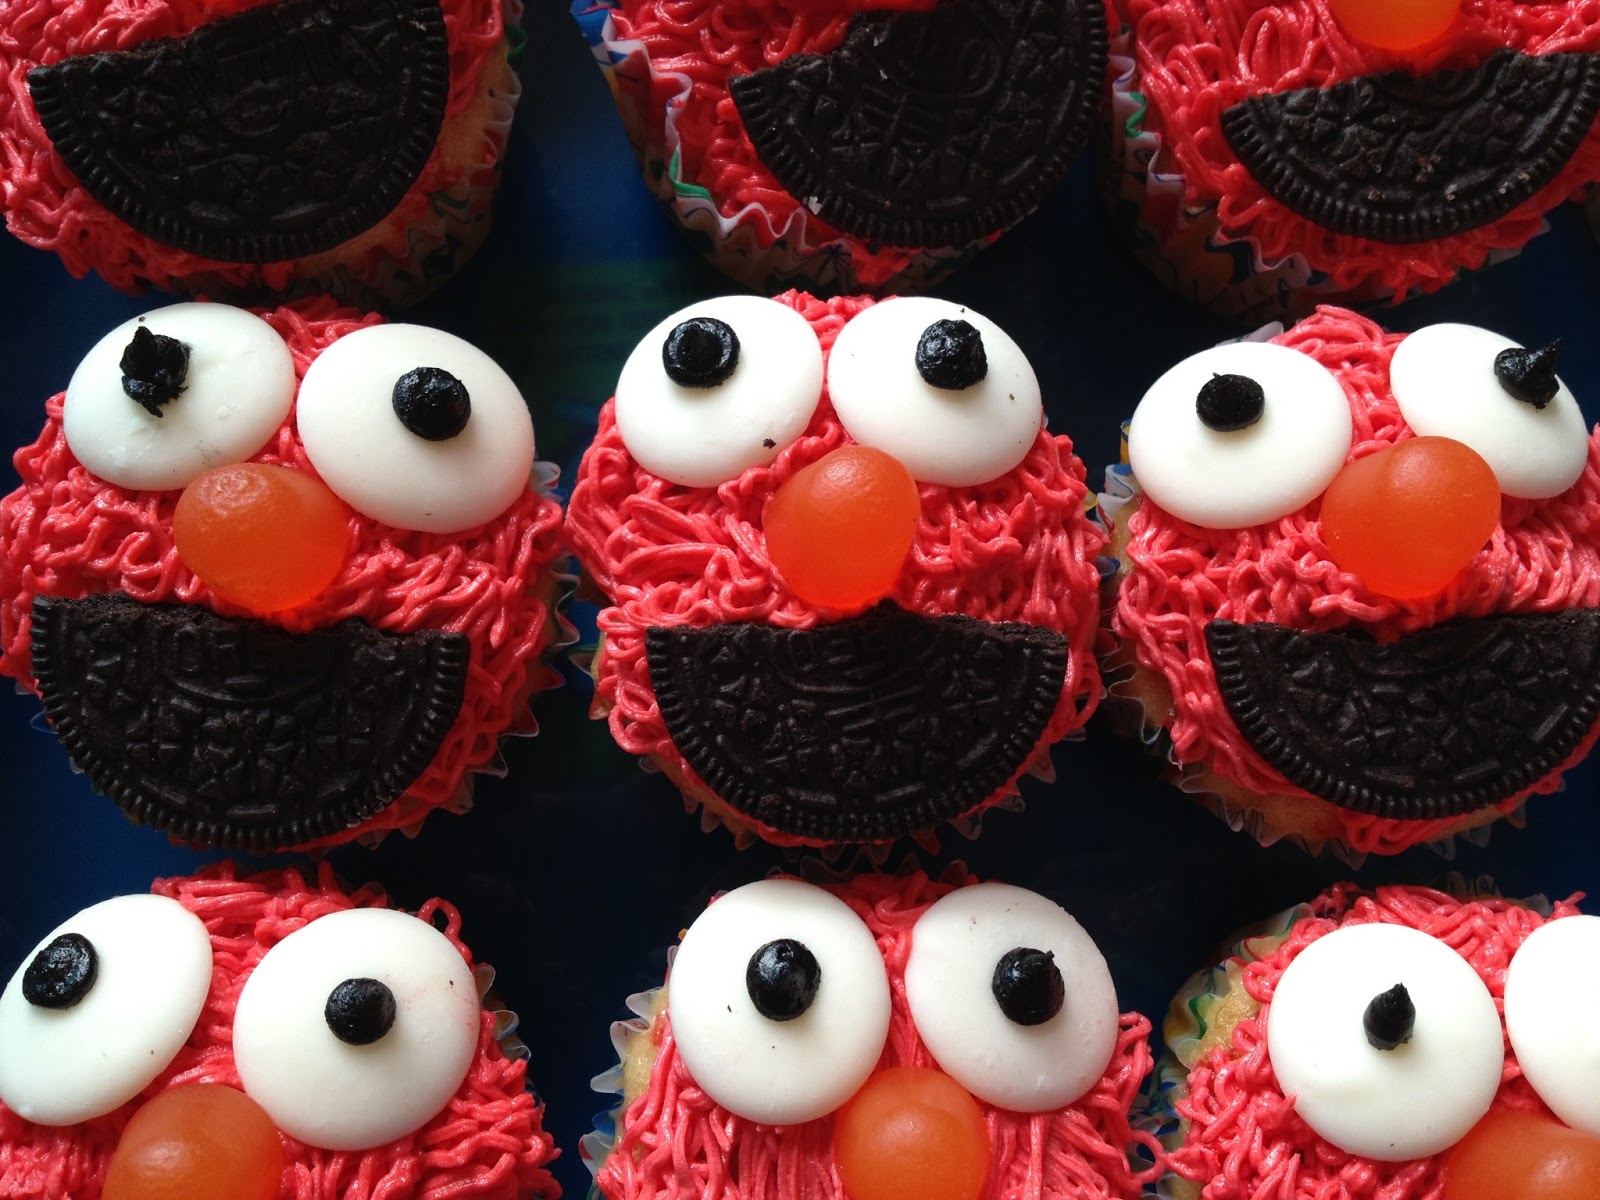
Elmo Cupcakes

About two months ago, I was asked if I could make cupcakes for a two year old's birthday party. Hazel is Noah's niece and she's pretty much the most brilliant child on the planet. She's goofy, smart, adorable, and her personality can just about make anyone happy. She calls me "Tourtney" and I basically melt when she's around. Ashley requested Elmo cupcakes, so I started brainstorming!
Luckily I'd previously made Cookie Monster cupcakes so I had some ideas. I used the Wilton grass tip to make fur, and Wilton Candy Melts and black gel to make the eyes. The mouths are half an Oreo and the noses are just orange Dots.
Ashley also requested a sheet cake. I've never attempted. I had originally planned on making one from scratch, but I got too scared... I got a plain one from Target with just white frosting and decorated it from there. I think it turned out just fine. Maybe next time I'll make my own.
I was so fortunate to be able to attend the party. Ashley and Trevor have always welcomed me into their home and I was so happy I was able to do this for them. They're great parents to Hazel and their newest addition Hope. They really enjoyed the cupcakes, and I was more than thrilled to do it for them. I'd do it again if I could.

One final picture- this is the birthday girl! Hazel was so excited about her Elmo cupcakes and I was just ecstatic that a two year old could actually recognize the cupcakes as Elmo. It was a wonderful day with wonderful weather and I will never forget it.

Monday, June 3, 2013

Marble Cake

Let me begin this post by warning you all that I do not do cakes. They always turn out lopsided and weird looking, so I've been a strictly cupcake girl for years. After my boyfriend, Noah requested that I make him a cake, I decided to leave my comfort zone for once. This cake did by all means not turn out perfect, but hey, it's an improvement! Maybe there will be further experimentation in the future.

My inspiration for this cake came from Will Arnett's character, GOB, on Arrested Development and one of his most popular lines, "I've made a huge mistake." If you haven't seen Arrested Development, you're missing out on one of the world's many fine creations and I suggest you watch the three original seasons, plus the 4th season made especially for Netflix that has become available for streaming within the past week.


I'd never made marble cake before this night. And yes, I do mean night. I finally finished this cake around 11 o'clock at night, so excuse me for the sloppy work. I normally wouldn't share work like this that I'm not so proud of, but this recipe honestly produced the best marble cake I've ever had. It was a perfect mix of light fluffy vanilla and deep, rich chocolate cake that was so moist it practically melted in your mouth. The middle layer of chocolate frosted perfectly complemented my grandma's own vanilla frosting. I don't know how that is possible, but seriously. This was amazing. I can't believe I gave this entire cake to Noah and his family and I only ate a piece. I probably would've eaten the entire thing in one sitting if I had the chance.


What you'll need:

For the yellow cake batter:

  • 1 1/2 cups cake flour (and yes, this was actually the first time I used cake batter. Maybe that's what helped make this cake so good?)
  • 1 cup sugar
  • 2 1/4 teaspoons baking powder
  • 1/4 teaspoon salt
  • 2 eggs
  • 1 egg yolk
  • 1 teaspoon vanilla
  • 1/2 cup plus 2 tablespoons buttermilk
  • 1/2 cup (1 stick) butter, softened


For the chocolate cake batter:

  • 1 cup cake flour
  • 1 cup sugar
  • 1/2 cup unsweetened cocoa powder
  • 1 teaspoon baking soda
  • 1/4 teaspoon salt
  • 1 egg
  • 1/2 teaspoon vanilla
  • 1/2 cup (1 stick) butter, softened
  • 1 cup freshly brewed coffee


For the middle layer of chocolate frosting:

  • 2 1/2 tablespoons butter, melted
  • 1/3 cup unsweetened cocoa powder
  • 1/2 teaspoon vanilla extract
  • 1 3/4 cups powdered sugar
  • 2 tablespoons of milk (at least. You might need more to reach a desired consistency)

For the rest of the frosting (my Grandma Pat's recipe!):

  • 3 cups powdered sugar
  • 1/3 cup butter, softened
  • 1 teaspoon vanilla
  • 1/3 cup cream or milk


Holy bajeesus. I know that's a lot of ingredients. And it's quite a bit of work, but I promise you that it was a ton of fun to make! 


To make:
-Preheat the oven to 350 degrees and grease either 3 8 inch round cake pans, or 2 9 inch round cake pans (works best with two, but it's really up to you!). You can line the pans with parchment paper before you grease if you want assurance that the cakes will actually come out in one piece!
- You'll end up needing about 4 large mixing bowls for each lot of wet and dry ingredients. Get ready to dirty some dishes!
- In one mixing bowl, mix together all the dry ingredients for the yellow cake batter. In another bowl, mix together all the dry ingredients for the chocolate cake batter. Set both dry mixes aside.
- For the yellow cake batter, cream together the butter,  eggs, egg yolk, vanilla, and two tablespoons of the buttermilk. Once that is mixed well, add the rest of the buttermilk. Slowly add the yellow cake batter dry mix to this wet batter and mix.
- For the chocolate cake batter, repeat the same procedure as the yellow cake batter. Cream the butter, eggs, sugar, vanilla, and buttermilk. Add the chocolate batter dry ingredients, then to help combine, slowly add the coffee. 
- Starting with the thicker vanilla batter, layer the two batters in each pan, or swirl with a knife if desired.
-Bake for about 25 minutes, allow to cool completely on a metal rack before frosting. 

Okay, mine didn't turn out as pretty as it could've... Better luck next time!

On to frosting! 

-First I trimmed each cake to make sure they wouldn't end up lopsided (I just learned this trick... Boy I was sure missin' out in the past!)
-For the chocolate frosting, beat the melted butter and cocoa powder together until combined. Add 2 tablespoons of milk and vanilla and beat until smooth. Then add the powdered sugar and beat. You'll probably need more milk, which is no big deal. Just get it to a consistency that you desire. You'll put this frosting on top of the first layer of the cake, kind of making it a cake sandwich with a chocolate frosting center. 
-My grandma's recipe is pretty simple; Just beat all the ingredients together and frost!


So this was definitely an experiment that I'll remember. No, this is not the most gorgeous thing I've ever baked, but it was pretty tasty and it's opened doors to a lot of other things I might now try. Thank you Noah, for requesting this, otherwise I never ever would've even tried. Oh and thank you to Arrested Development, always and inspiration!

Enjoy!

Tuesday, March 26, 2013

Cookie Monster Cupcakes

I don't have a recipe for these, but I made them for Cooper's birthday earlier in March. They were super easy, and all I needed was to buy a Wilton Grass Tip. Which is awesome. I used white Wilton Candy Melts for the eyes, black decorating gel for the pupils, and mini Chips Ahoy, as the cookie mouth. Oh yeah, Noah decorated the orange ones. He's so awesome.


Super Fudgey Brownies

Those of you who know me are aware that cupcakes are my thing. If I even hear the word "cupcake" my ears perk up and I immediately start talking about them. If I could create a religion, I've always said that cupcakes would be my deity. This all might have been true until today.

When I found a recipe for brownies this morning, I was skeptical. Brownie recipes have always scared the crap out of me. This is mostly because some of my first failed baking attempts many years ago involved trying to make homemade brownies. Since then, I've mostly stuck to a box. Boxed brownies have always been faithful and there filled with dense chocolatey goodness. Today I left my safe comfort zone of boxed brownies and I may have left it for good.

I had all day to prepare myself to bake something, since I stayed home with a migraine. Maybe I decided to make this attempt because my head wasn't feeling quite right, or maybe I was just feeling more adventurous today. Whatever it was, I'm thankful. When I say these brownies were amazing, I mean it. I had to restrain myself so I wouldn't eat both pans (I doubled the recipe. Oops.) and I could save some for the members of the political club that I am a co-founder of, where I believe that politics and baked goods can mix perfectly. I hope my club members will be please tomorrow. I certainly am.

What you'll need (don't worry, this is a recipe for just one pan. You won't be on brownie overload, I promise:


  • 10 tablespoons butter
  • 1 1/4 cup sugar
  • 3/4 and 2 tablespoons unsweetened cocoa powder
  • 1/4 teaspoon salt
  • 1/2 teaspoon vanilla extract
  • 2  eggs, cold
  • 1/2 cup flour
  • Chocolate frosting (optional. I used chocolate frosting on one of my pans, but not the other. Some people think frosting ruins brownies. Then there's me. I say there's no such thing as too much chocolate.)
-Preheat the oven to 325 degrees. Line a 8x8 square pan with enough wax paper to hang over each side of the pan.
- Simmer a small pot of water. Place a heatproof bowl over the pot of water and add the butter, sugar, cocoa powder, and salt. Stir until butter melts.
-Remove the melted chocolate mixture from heat and let cool until warm. Using a wooden spoon, mix in the vanilla, then incorporate the eggs one at a time and mix vigorously. 
-Stir in flour until there are no streaks left behind.
-Pour batter over the wax paper lined pan and bake brownies for 20-25 minutes, or until a toothpick inserted comes out clean.
-Let brownies cool before removing wax paper. Frost, if desired, then cut brownies into desired sizes.

Enjoy!


Original recipe: